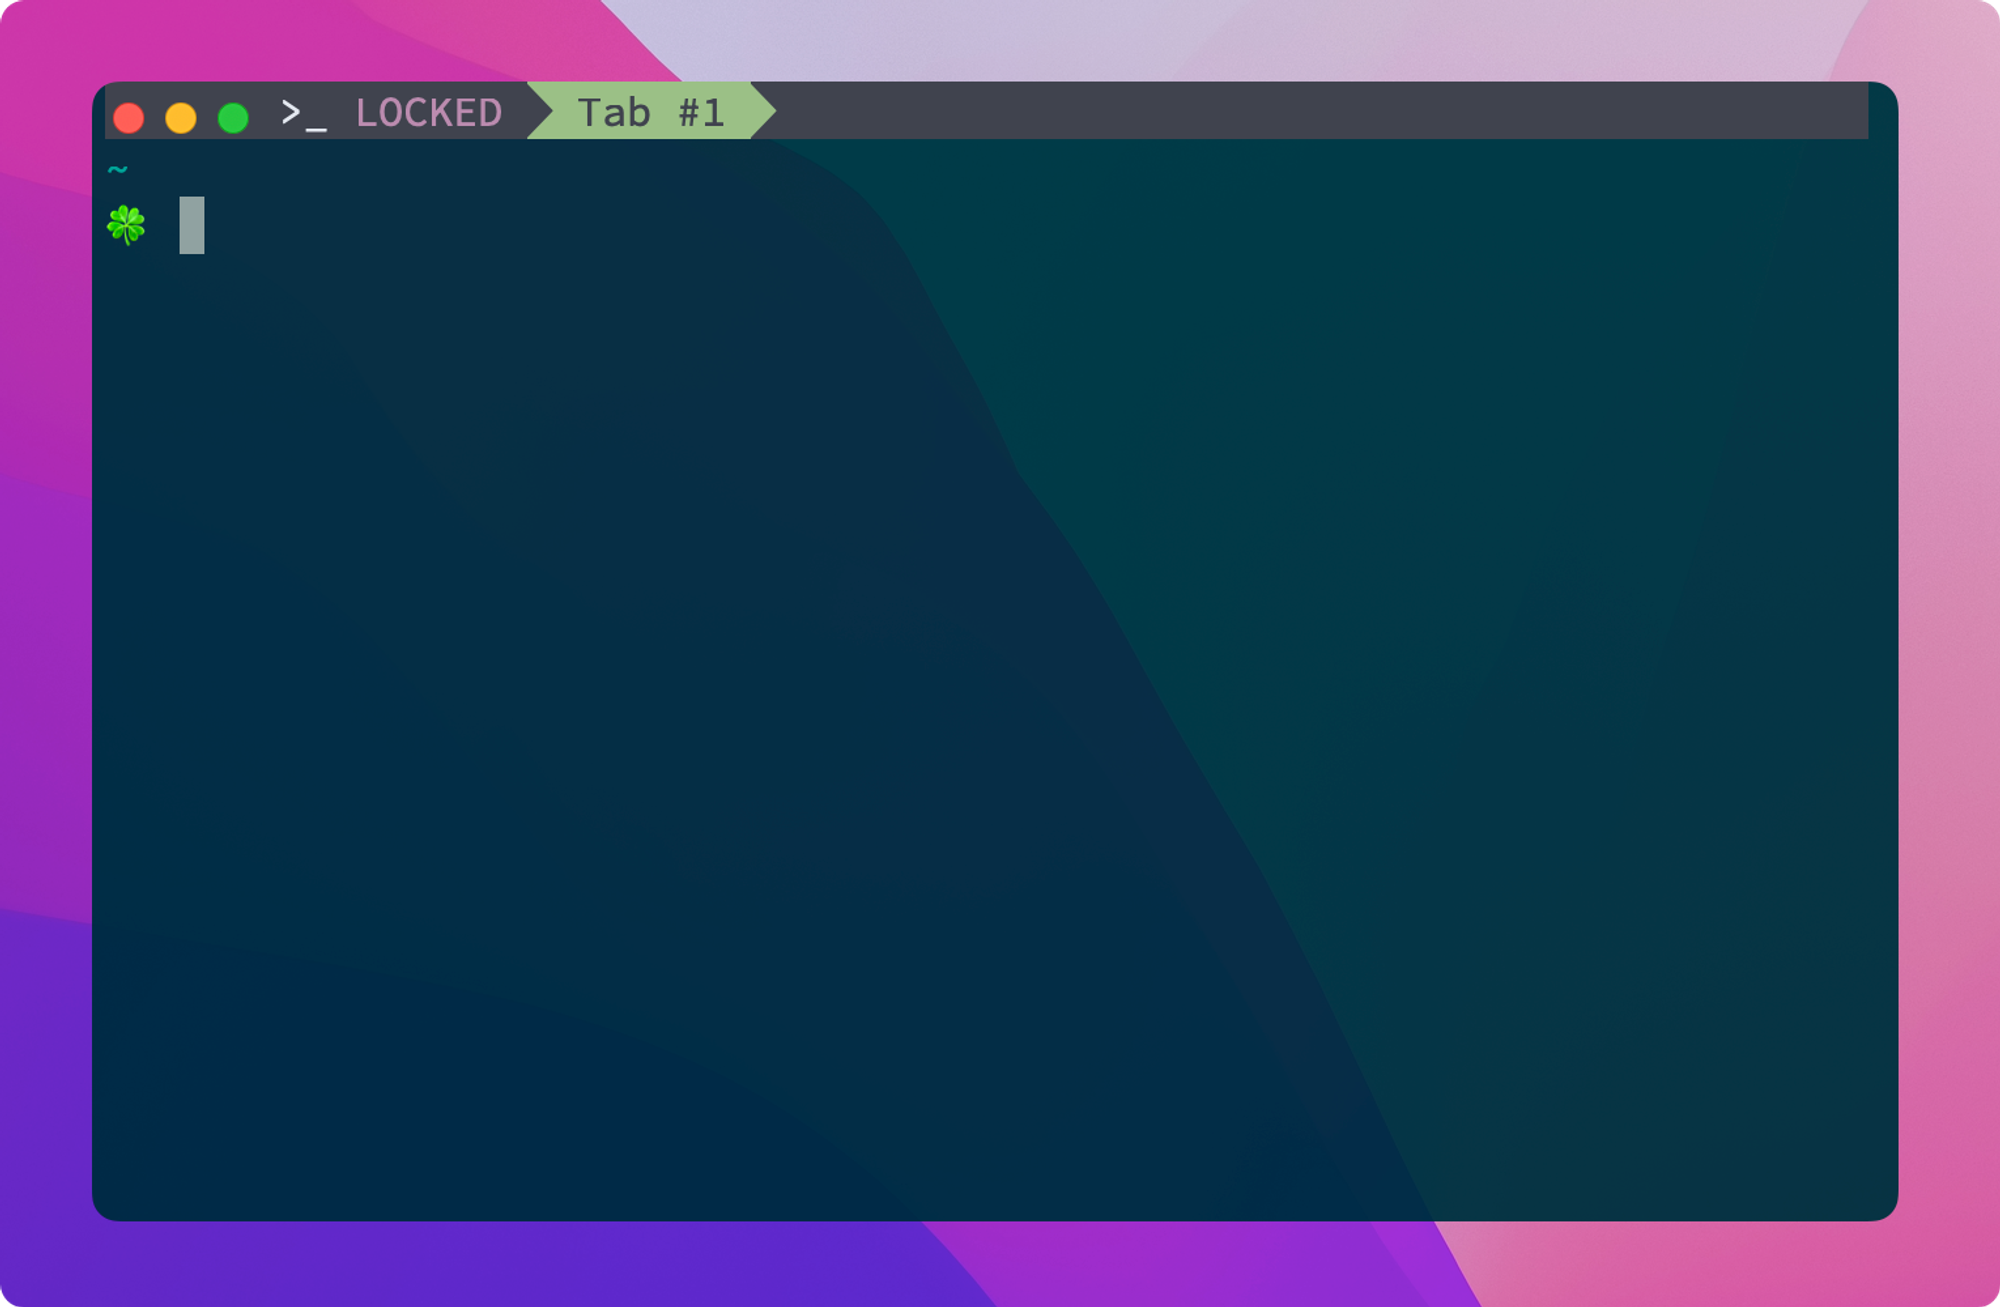
我的终端: Alacritty, Fish, Starship, Zellij
slug
2023-terminal
date
Apr 14, 2023
summary
用了 zsh + tmux + iterm2 方案几年后, 在前段时间机缘巧合下, 用上了新的组合方案. 经过一段时间使用, 配置插件等逐渐稳定下来了, 于是分享记录一下.
tags
Terminal
status
Published
type
Post
前段时间被 zsh + tmux + iterm2 卡到怀疑人生, 于是想揪出到底什么东西导致我的终端变得这么卡 (执行/bin/zsh -i -x可以看详细 zsh 启动日志), 后来发现是一条 alias 命令.这条 alias 命令如下:alias kcu="echo -n $(kubectl config current-context)':' && echo $(kubectl config view --minify --output 'jsonpath={..namespace}')"看起来平平无奇, 我手动执行也立马就返回结果了. 但是放到.zshrc之后, zsh + tmux 的启动速度就变成 10-20 秒了, 怪异得很.为了快乐摸鱼(工作), 我决定鼓捣一下我的终端, 在使用了近两个月后, 我的新终端也稳定下来了, 于是总结成文记录一下.

终端模拟器: Alacritty
Alacritty 是一个跨平台的 GPU 加速终端模拟器, 它启动超级快, 并且可自定义程度高. 它使用 YAML 文件进行配置, 可以轻松地自定义字体, 颜色, 快捷键等.
安装自不用多说, 可以官网下载也可以通过 brew 安装.
brew install alacritty
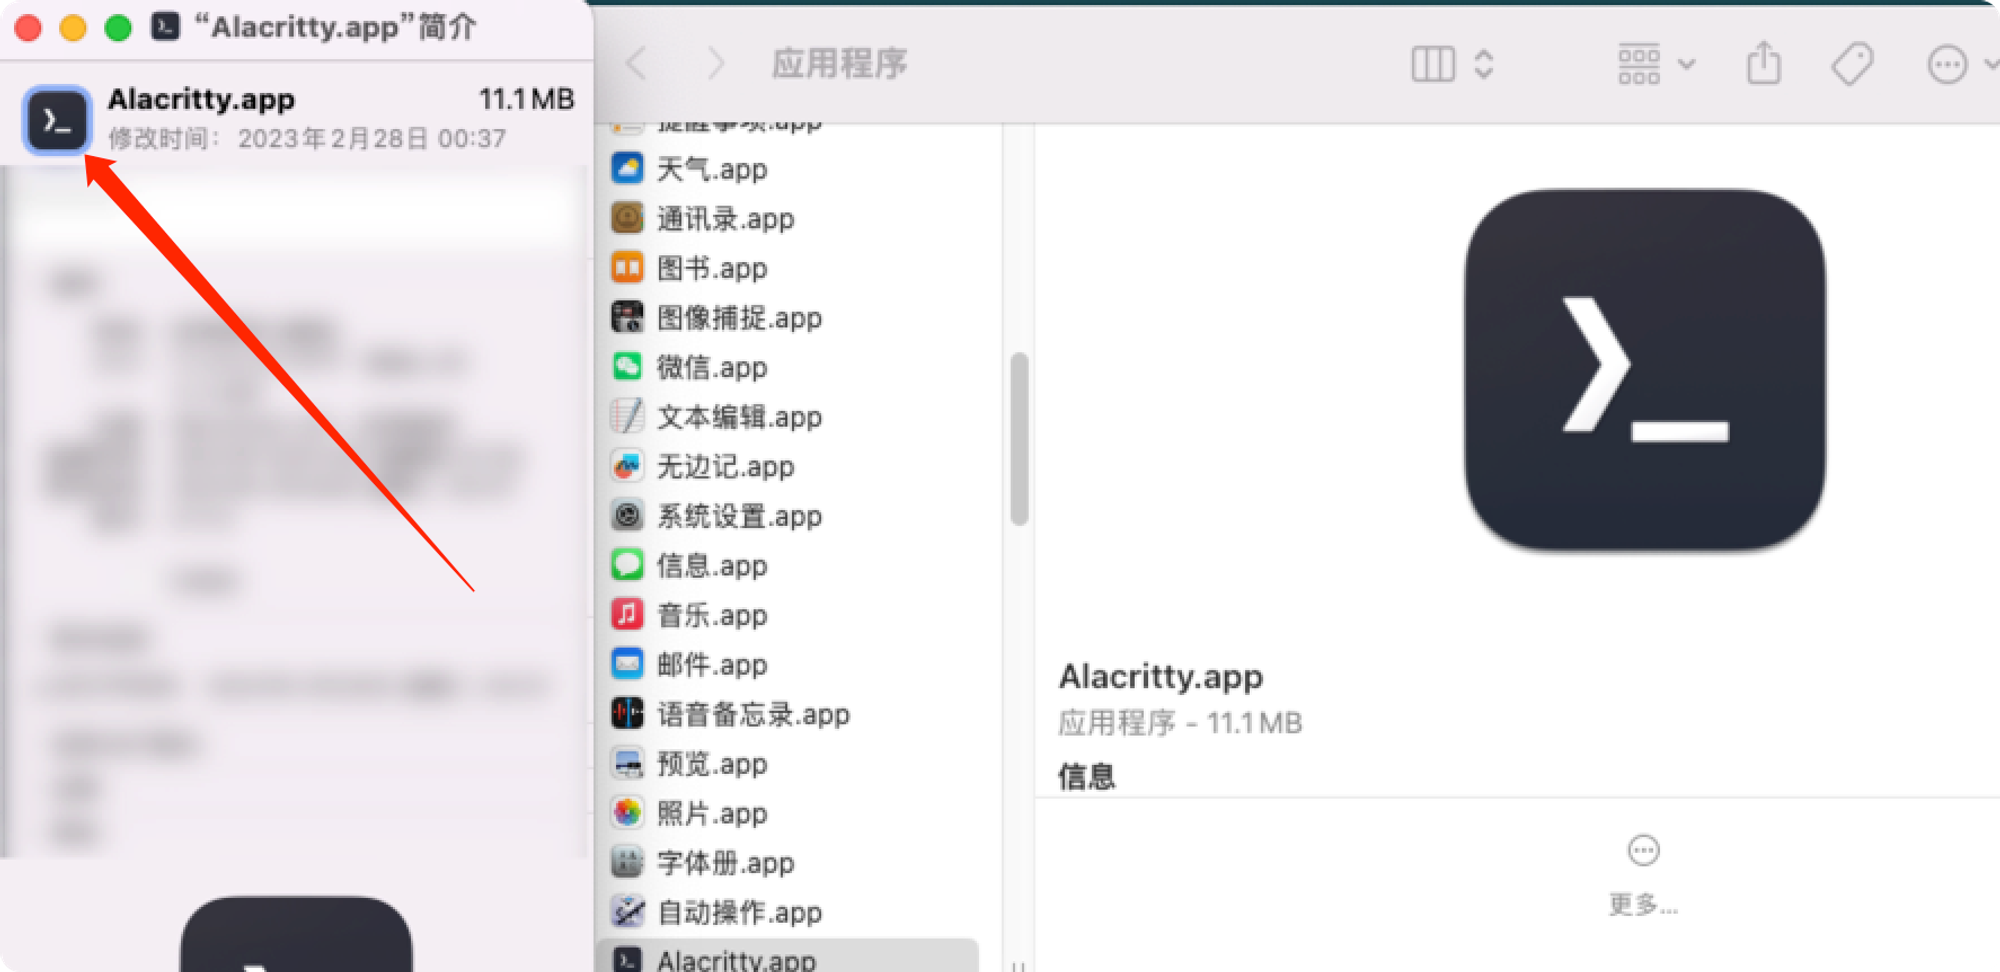
Alacritty 默认图标蛮丑的, 去 这个网站 上找一个你喜欢的图标替换吧. 替换方法就是把下载好的图标文件拖到 应用程序简介 的箭头那个位置就好了 (快捷键 cmd+i 打开应用程序简介).

每个人的配置喜好不一样, 我的配置在下面, 你可以参考我的配置.
我的配置文件 (~/.config/alacritty/alacritty.yml)
# 指定 Alacritty 启动时使用 Fish Shell
shell:
  program: /usr/local/bin/fish
  args:
    - --login

# 不指定 TERM 会导致一些旧机器通过 ssh 连接时无法正常工作
env:
  TERM: xterm-256color

# Colors (Tomorrow Night Bright)
colors:
  # Default colors
  primary:
    background: '0x002b36'
    foreground: '0x93a1a1'

  # Colors the cursor will use if `custom_cursor_colors` is true
  cursor:
    text: '0x002b36'
    cursor: '0x93a1a1'

  # Normal colors
  normal:
    black:   '0x002b36'
    red:     '0xdc322f'
    green:   '0x859900'
    yellow:  '0xb58900'
    blue:    '0x268bd2'
    magenta: '0x6c71c4'
    cyan:    '0x2aa198'
    white:   '0x93a1a1'

  # Bright colors
  bright:
    black:   '0x657b83'
    red:     '0xdc322f'
    green:   '0x859900'
    yellow:  '0xb58900'
    blue:    '0x268bd2'
    magenta: '0x6c71c4'
    cyan:    '0x2aa198'
    white:   '0xfdf6e3'

  indexed_colors:
    - { index: 16, color: '0xcb4b16' }
    - { index: 17, color: '0xd33682' }
    - { index: 18, color: '0x073642' }
    - { index: 19, color: '0x586e75' }
    - { index: 20, color: '0x839496' }
    - { index: 21, color: '0xeee8d5' }

# 设置字体
# 字体下载: https://www.nerdfonts.com/font-downloads
# 图标符号搜索: https://www.nerdfonts.com/cheat-sheet
# 推荐备选字体: JetBrains Mono Regular Nerd Font Complete Mono
font:
  normal:
    family: 'SauceCodePro Nerd Font Mono'
    style: Regular
  bold:
    family: 'SauceCodePro Nerd Font Mono'
    style: Regular
  italic:
    family: 'SauceCodePro Nerd Font Mono'
    style: Italic
  bold_italic:
    family: 'SauceCodePro Nerd Font Mono'
    style: Italic

  # 字体大小
  size: 16.0

  offset:
    x: 0
    y: 4
  glyph_offset:
    x: 0
    y: 2

window:
  # 窗口透明度 (0 全透明, 1 不透明)
  opacity: 0.9
  padding:
    x: 5
    y: 0
  decorations: transparent

scrolling:
  # 回滚缓冲区中的最大行数,指定“0”将禁用滚动。
  history: 10000
  # 滚动行数
  multiplier: 4

cursor:
  style:
    shape: Block

selection:
  semantic_escape_chars: ',│`|:"'' ()[]{}<>'
  save_to_clipboard: true

live_config_reload: true

# 全屏显示窗口, 绑定快捷键 Ctrl-x
key_bindings:
  - { key: X, mods: Control, action: ToggleSimpleFullscreen }
我非常喜欢原来 iterm2 的 Hotkey Window 功能, 它可以让我在任何桌面调用出终端窗口. Alacritty 不支持这个功能, 但是可以通过第三方软件实现. 我尝试了 这篇文章 中的做法, 使用 hammerspoon 控制窗口隐藏显示. 但是该文章里的插件是预编译好的 (自己编译要把 xcode 环境搭起来成本巨大懒得折腾), 而且要的权限有点高, 出于风险考虑, 我没有使用它. 最终用 Raycast 的快捷键功能简单实现了快速显示隐藏窗口.
终端窗口管理器: Zellij
Zellij 是一个 TUI (Terminal User Interface) 多窗口管理器 (替代 Tmux), 可以在终端中创建多个窗口, 并将它们分割成不同的面板. 它还支持自定义快捷键和布局, 它的设计理念和 tmux 不太一样, 感觉借鉴了不少 nvim 的操作逻辑.
在 macOS 下, 可以使用 Homebrew 安装 Zellij:
brew install zellij
安装完成后, 可以通过
zellij 命令启动 Zellij.默认的 Zellij 有很多不太痛快的地方, 比如强制显示 Zellij 的文字在相关的 status bar 组件上. 从 Issue 看作者不愿意隐藏 Zellij 的文字 Logo, 考虑到项目早期推广, 希望品牌露出可以理解.
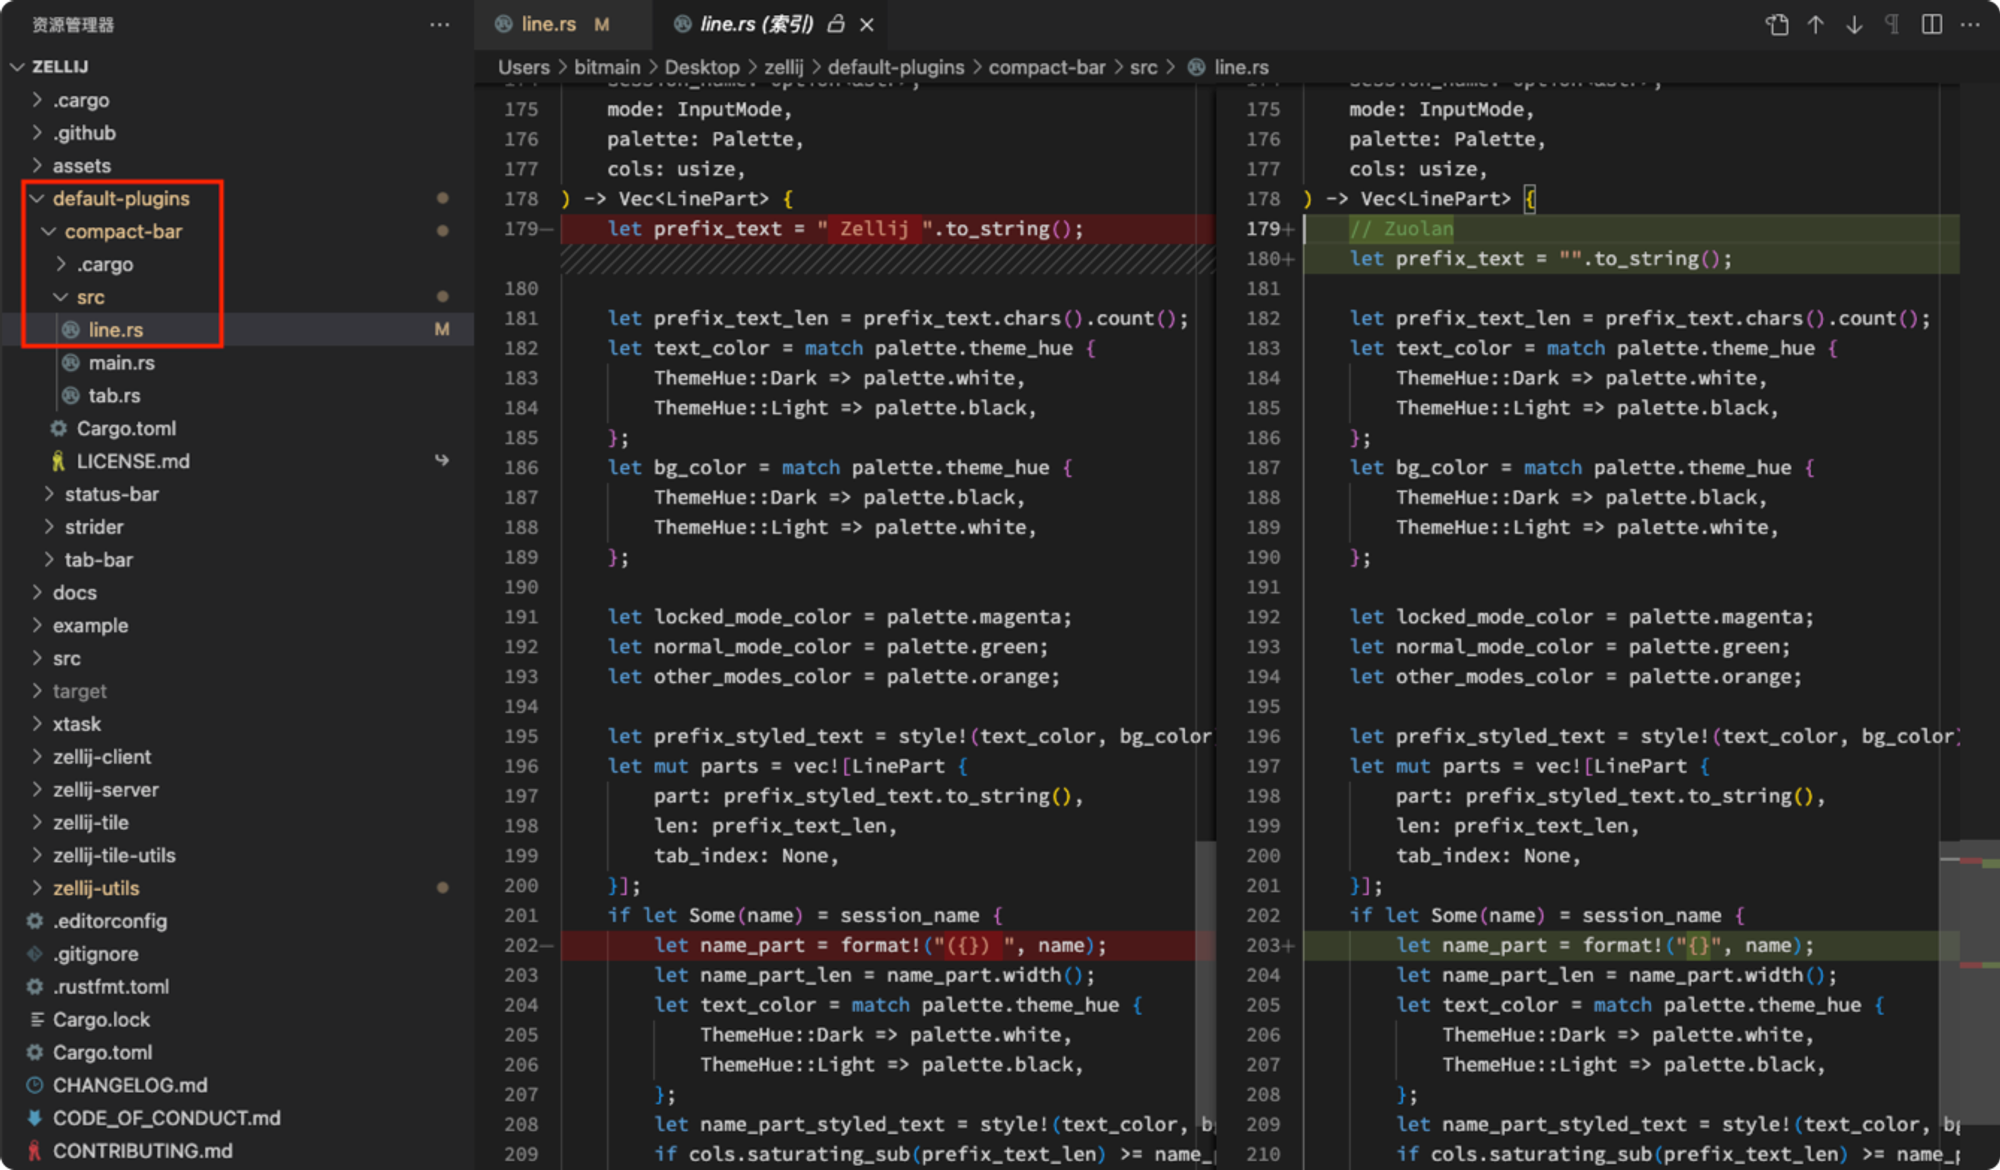
好在 Zellij 是开源的, 我们可以很轻易隐藏这个 Logo, 首先克隆 Zellij 仓库:
git clone https://github.com/zellij-org/zellij
# 如下图修改一个文件, 就两行代码而已.
# 然后执行构建把生成的二进制文件存到 /tmp 目录
cargo xtask install /tmp

构建过程也许有点漫长, 耐心等待. 构建完成后可以在
/tmp 目录看到 zellij 二进制文件. 把它移动到 /usr/local/bin/zellij 位置即可.我的 Zellij 配置 (~/.config/zellij/config.kdl)
default_shell "/usr/local/bin/fish"
// default_shell "/bin/zsh"

// 默认布局
default_layout "zuolan"

// 无箭头字体
// simplified_ui true

// 显示边框
pane_frames false

// 缓冲区行数
scroll_buffer_size 10000

// 鼠标选择和选择即复制, 按住 shift 使用终端原生选词
copy_on_select true
mouse_mode true

// 镜像会话
mirror_session true

// 默认模式
default_mode "locked"

// 主题
theme "nord"
themes {
   nord {
        fg 216 222 233
        bg 46 52 64
        black 64 67 77
        red 191 97 106
        green 163 190 140
        yellow 235 203 139
        blue 129 161 193
        magenta 180 142 173
        cyan 136 192 208
        white 229 233 240
        orange 208 135 112
    }
}

// 自定义快捷键
keybinds {
    pane clear-defaults=true {}
    resize clear-defaults=true {}
    move clear-defaults=true {}
    session clear-defaults=true {}
    scroll clear-defaults=true {}
    tmux clear-defaults=true {}
    renamepane clear-defaults=true {}
    tab clear-defaults=true {
        bind "Ctrl s" "Ctrl d" "Esc" "Enter" { SwitchToMode "locked"; }
        bind "]" { GoToNextTab; }
        bind "[" { GoToPreviousTab; }
    }
    locked clear-defaults=true {
        bind "Ctrl s" { SwitchToMode "normal"; }
        bind "Ctrl d" { SwitchToMode "locked"; }  // 防止意外退出
    }
    search clear-defaults=true {
        // 搜索上一个
        bind "p" { SearchToggleOption "CaseSensitivity"; Search "up"; }
        // 搜索下一个
        bind "n" { SearchToggleOption "CaseSensitivity"; Search "down"; }
        // 退出搜索
        bind "Ctrl s" "Ctrl d" "Esc" "Enter" { SwitchToMode "locked"; }
    }
    entersearch clear-defaults=true {
        // 输入搜索关键词之后, 按下回车进入搜索模式
        bind "Enter" { SwitchToMode "Search"; }
        // 退出搜索
        bind "Ctrl s" "Ctrl d" "Esc" { SwitchToMode "locked"; }
    }
    renametab clear-defaults=true {
        // 改标签名称后返回锁定模式
        bind "Ctrl s" "Ctrl d" "Esc" "Enter" { SwitchToMode "locked"; }
    }
    normal clear-defaults=true {
        // 切换到锁定模式
        bind "Ctrl s" "Ctrl d" "Esc" "Enter" { SwitchToMode "locked"; }
        // 关闭当前焦点区域
        bind "x" { CloseFocus; SwitchToMode "locked"; }
        // 编辑缓冲区内容
        bind "e" { EditScrollback; SwitchToMode "locked"; }
        // 上一页/下一页
        bind "Tab" { ToggleTab; SwitchToMode "locked"; }
        bind "]" { GoToNextTab; SwitchToMode "tab"; }
        bind "[" { GoToPreviousTab; SwitchToMode "tab"; }
        // 新建标签页
        bind "c" { NewTab; SwitchToMode "locked"; }
        // 页内移动焦点
        bind "h" { MoveFocus "Left"; SwitchToMode "locked"; }
        bind "l" { MoveFocus "Right"; SwitchToMode "locked"; }
        bind "k" { MoveFocus "Up"; SwitchToMode "locked"; }
        bind "j" { MoveFocus "Down"; SwitchToMode "locked"; }
        // 页内交换区域
        bind "Alt h" { MovePane "Left"; SwitchToMode "locked"; }
        bind "Alt l" { MovePane "Right"; SwitchToMode "locked"; }
        bind "Alt k" { MovePane "Up"; SwitchToMode "locked"; }
        bind "Alt j" { MovePane "Down"; SwitchToMode "locked"; }
        // 分屏
        bind "\\" { NewPane "Right"; SwitchToMode "locked"; }
        bind "-" { NewPane "Down"; SwitchToMode "locked"; }
        // 调整分屏大小
        bind "Left" { Resize "Left"; }
        bind "Right" { Resize "Right"; }
        bind "Up" { Resize "Up"; }
        bind "Down" { Resize "Down"; }
        // 同步所有分屏
        bind "`" { ToggleActiveSyncTab; SwitchToMode "locked"; }
        // 重命名标签页
        bind "," { SwitchToMode "RenameTab"; TabNameInput 0; }
        // 浮动分屏
        bind "Space" { ToggleFloatingPanes; SwitchToMode "locked"; }
        // 搜索模式
        bind "s" { SwitchToMode "EnterSearch"; SearchInput 0; }
        // 放大分屏
        bind "z" { ToggleFocusFullscreen; SwitchToMode "locked"; }
    }
}
我的布局文件示例 (~/.config/zellij/layouts/zuolan.kdl)
layout {
    default_tab_template {
        pane size=1 borderless=true {
            plugin location="zellij:compact-bar"
        }
        children
    }
}
我的快捷键是根据以前使用 tmux 的习惯改的, 你可以参考 Zellij 文档 按需修改.
Fish
试了一下久闻大名的 Fish, 感觉还不错, 安装老规矩:
# macOS
brew install fish

# Linux
sudo apt-add-repository ppa:fish-shell/release-3
sudo apt update
sudo apt install fish
安装 Fish 管理插件的工具 fisher:
curl -sL https://raw.githubusercontent.com/jorgebucaran/fisher/main/functions/fisher.fish | \
	source && fisher install jorgebucaran/fisher
# 再安装 fzf 插件, 搜索历史记录很方便
git clone --depth 1 https://github.com/junegunn/fzf.git ~/.fzf
~/.fzf/install
fisher install PatrickF1/fzf.fish
Fish 配置目录是
~/.config/fish, 我用三个 .fish 文件分开不同的配置:config.fish (示例文件, 按自己情况设置)
# https://fishshell.com/docs/
# 不显示 Fish 启动欢迎信息
set -g fish_greeting
# 根据情况自己修改变量
set -x EDITOR             $HOME/.local/bin/lvim
set -x KUBE_EDITOR        $HOME/.local/bin/lvim

set -x GOPATH             $HOME/Workspaces
set -x GOROOT             /usr/local/opt/go/libexec
set -x PNPM_HOME          $HOME/Library/pnpm
set -x PATH               $PATH \
                          $GOPATH/bin \
                          $GOROOT/bin

source ~/.config/fish/alias.fish
source ~/.config/fish/function.fish

# ctrl-w 逐词删除
bind \cw backward-kill-word

# Starship init
starship init fish | source

# Zellij attach (自动 attach 已存在的会话)
if not set -q ZELLIJ
  zellij attach || zellij attach -c '       >_'
end

# Set proxy (自动设置代理)
export SHELL_PROXY='🚀'
set PROXY 'http://127.0.0.1:7890'
export https_proxy=$PROXY http_proxy=$PROXY all_proxy=$PROXY
alias.fish (示例文件, 按自己情况设置)
##################
# Kubectl
##################
alias k="kubectl --insecure-skip-tls-verify=true"
alias krm="confirm kubectl delete"

##################
# Docker
##################
alias dimg="docker images"
function.fish (示例文件, 按自己情况设置)
# 一个 fish 函数示例, 用法如下:
# z on -- 打开代理
# z off -- 关闭代理
# z port 3000 -- 转发 192.168.1.1 的 3000 端口到本地 3000 端口
# z -- 刷新终端配置
function z --description '常用个人操作合集'
  set proxy_command $argv[1]
  set proxy_forward_port $argv[2]
  switch $proxy_command
  case off
    set -g -e https_proxy http_proxy all_proxy
    export SHELL_PROXY=''
  case on
    set PROXY 'http://127.0.0.1:7890'
    export SHELL_PROXY='🚀'
    export https_proxy=$PROXY http_proxy=$PROXY all_proxy=$PROXY
  case port
    ssh -NL 127.0.0.1:$proxy_forward_port:127.0.0.1:$proxy_forward_port root@192.168.1.1 -p 2222
  case '*'
    source ~/.config/fish/config.fish && tput cnorm
  end
end

# 一个交互式函数示例, 用法如下:
# 在任意命令前面加 confirm 可以调用这个函数
# 用来执行一些危险操作时提醒自己
function confirm --description 'kubectl 执行危险操作时需要额外按下 y 键确认'
  set context $(kubectl config view --minify --output 'jsonpath={..namespace}' && echo -n ':' && kubectl config current-context)
  echo -e "\033[1;33m确定在 $context 执行 $argv 吗?"
  read --prompt-str '输入 [N/y]: ' REPLY
  if test "$REPLY" = "y" -o "$REPLY" = "Y"
    $argv
  else
    echo '操作取消.'
  end
end

# 一个配合 fzf 实现的函数, 可以交互式查看 k8s 集群日志并进入对应容器
# 用法就是 ksh 回车
function ksh --description '一个方便快速进入某个容器内部的函数'
  kubectl get pods --all-namespaces -o jsonpath='{range .items[*]}{.metadata.namespace}{"\t"}{.metadata.name}{"\n"}' | fzf --preview='echo {} | xargs kubectl logs --tail 1000 -n'  --preview-window=up:80% | read -r namespace pod
  export container=$(kubectl get pod -n $namespace $pod -o jsonpath='{.spec.containers[*].name}' | tr ' ' '\n' | fzf)
  export shell=$(echo '/bin/bash /bin/sh' | tr ' ' '\n' | fzf)
  kubectl exec -n $namespace --stdin --tty $pod --container $container -- $shell
end

function ls --description 'command ls 可以隐藏文件夹后面的斜杠, 所以覆盖 fish 默认的 ls 用法'
  set -l opt -G
    command ls $opt $argv
end

# function bind_global_alias --description '本地全局快捷键, 按下 ctrl-x 触发'
#   switch (commandline -t)
#   case 'allns'
#     commandline -rt " --all-namespaces"
#   case 'pc4'
#     commandline -rt 'proxychains4 -q'
#   case 'w'
#     commandline -rt '| wc'
#   end
# end
# bind \cx bind_global_alias
服务端使用 Fish 作为默认 Shell 的一个小坑

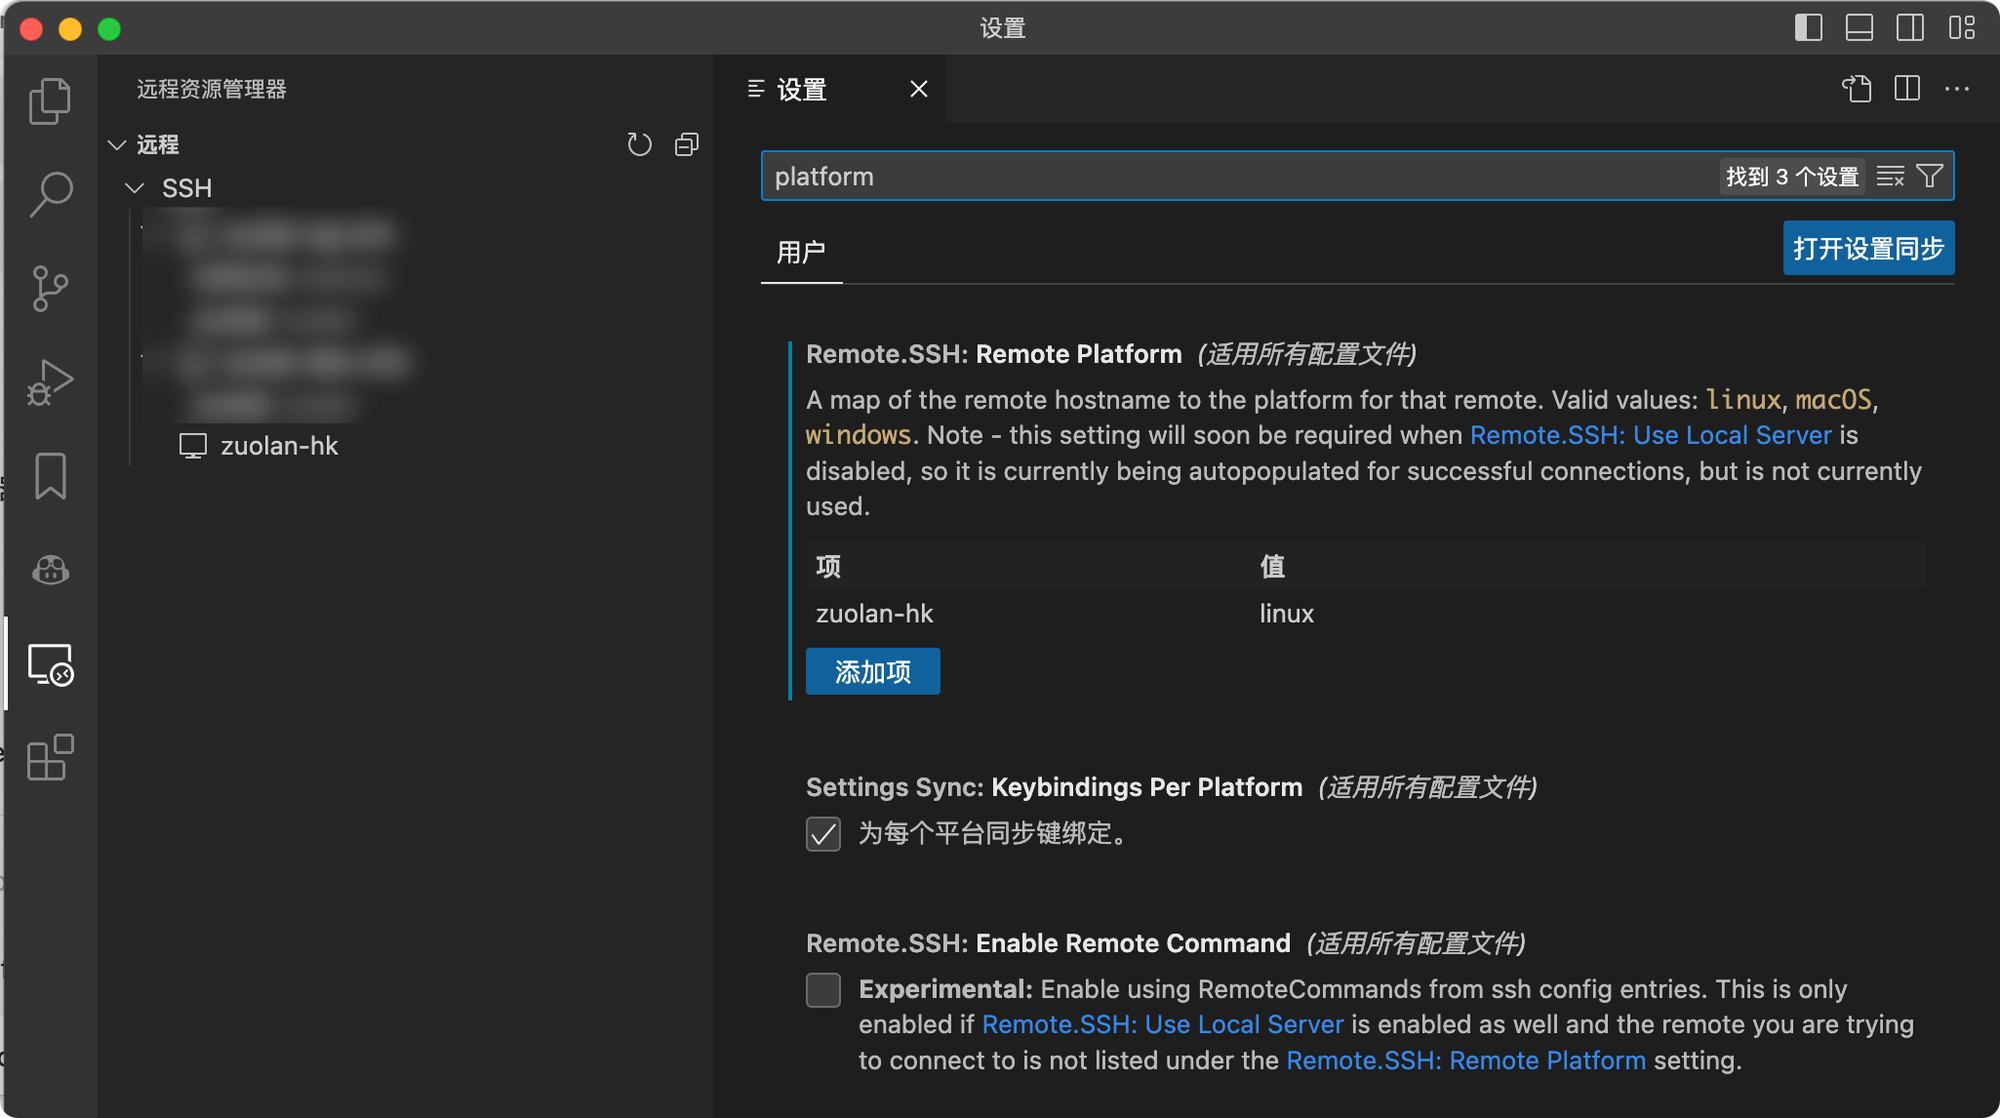
VSCode 的 remote ssh server 插件默认不兼容服务器端的 Fish, 需要设置 Remote Platform, 添加对应的 hostname 并指定平台.

保持 Fish 清爽, 快乐!~
Starship
Starship 是一个快速的, 可定制的 Shell 提示符工具, 功能超级丰富, 速度还不错. 可以使用以下命令安装 Starship:
# macOS
brew install starship
# Linux
curl -sS https://starship.rs/install.sh | sh
安装完成后, 把配置文件放到
~/.config 目录下就可以用, 配置修改即刻生效. 更多用法看官方文档.配置文件参考 (~/.config/starship.toml):
# Don't print a new line at the start of the prompt add_newline = false command_timeout = 500 [username] disabled = true [hostname] disabled = true [container] disabled = true [line_break] disabled = false [directory] truncation_length = 8 # 最长显示路径级别 truncate_to_repo = false # 在 git 目录下不截断路径 style = "bold cyan" read_only = " " [kubernetes] format = "[$context:$namespace](blue) " disabled = false [character] success_symbol = "[](bold green)" error_symbol = "[](bold red)" [env_var] variable = "SHELL_PROXY" format = "[$env_value](blue) " [cmd_duration] min_time = 4_000 # 4000ms show_milliseconds = true style = "yellow" [git_branch] symbol = " " [docker_context] symbol = " " disabled = true [package] symbol = " " disabled = true [aws] symbol = " " disabled = true [gcloud] disabled = true [c] symbol = " " [dart] symbol = " " [elixir] symbol = " " [golang] symbol = " " [haskell] symbol = " " [lua] symbol = " " [python] symbol = " " [ruby] symbol = " " [rust] symbol = " " [nim] symbol = " " [nix_shell] symbol = " "
这就是我最近在用的终端啦~